-
Feature Matching + Homography to find ObjectsRobotics/Open CV python 2019. 7. 24. 16:09
Feature Matching + Homography to find Objects
Goal
- 우리는 복잡한 이미지에서 알고 있는 객체를 찾기 위해 calib3d 모듈에서 feature matching과 findHomography를 섞을 것입니다.
Basics
그래서 우리는 지난 단원에서 무엇을 했습니까? 우리는 queryImage를 사용하고, 거기에 몇 가지 feature points을 발견했으며, 또 다른 trainImage를 가져 와서 그 이미지의 feature을 발견했으며, 우리는 그 중에서도 가장 잘 맞는 것을 발견했습니다. 간략히 말하자면, 우리는 객체의 일부분이 다른 복잡한 이미지에서 존재하는 위치를 발견했습니다. 이 정보는 trainImage에서 정확하게 대상을 찾는 데 충분합니다.
이를 위해 우리는 calib3d 모듈의 함수, 즉 cv2.findHomography ()를 사용할 수 있습니다. 두 이미지에서 점 집합을 전달하면 해당 객체의 perpective transformation(원급법 변형)을 찾습니다. 그런 다음 cv2.perspectiveTransform ()을 사용하여 객체를 찾을 수 있습니다. 변환을 찾으려면 최소한 네 가지 정확한 점이 필요합니다.
matching하는 동안 몇 가지 가능한 오류가있어 결과에 영향을 줄 수 있음을 확인했습니다. 이 문제를 해결하기 위해 알고리즘은 RANSAC 또는 LEAST_MEDIAN (플래그로 결정될 수 있음)을 사용합니다. 올바른 추정을 제공하는 좋은 일치를 inliers라고하고 나머지를 outliers라고합니다. cv2.findHomography ()는 inlier와 outlier 점을 지정하는 마스크를 리턴합니다.
이제 해봅시다 !!!
Code
먼저, 이미지에서 SIFT 기능을 찾고 최적의 일치를 찾기 위해 비율 테스트를 적용 해 보겠습니다.
import numpy as np
import cv2
from matplotlib import pyplot as plt

MIN_MATCH_COUNT = 10

img1 = cv2.imread('box.png',0)          # queryImage
img2 = cv2.imread('box_in_scene.png',0) # trainImage

# Initiate SIFT detector
sift = cv2.SIFT()

# find the keypoints and descriptors with SIFT
kp1, des1 = sift.detectAndCompute(img1,None)
kp2, des2 = sift.detectAndCompute(img2,None)

FLANN_INDEX_KDTREE = 0
index_params = dict(algorithm = FLANN_INDEX_KDTREE, trees = 5)
search_params = dict(checks = 50)

flann = cv2.FlannBasedMatcher(index_params, search_params)

matches = flann.knnMatch(des1,des2,k=2)

# store all the good matches as per Lowe's ratio test.
good = []
for m,n in matches:
    if m.distance < 0.7*n.distance:
        good.append(m)
이제 객체를 찾기 위해 최소한 10 개의 일치 (MIN_MATCH_COUNT에 의해 정의 됨)가 조건을 설정합니다. 그렇지 않으면 단순히 충분히 match하지 않다는 메시지를 표시하십시오.
만약 충분히 match면 두 이미지에서 matched keypoints 의 위치를 추출합니다. 그들은 perpective transformation 을 찾기 위해 전달됩니다. 이 3x3 변환 행렬을 얻으면 이를 사용하여 queryImage의 모서리를 trainImage의 해당 점으로 변환합니다. 그런 다음 그립니다.
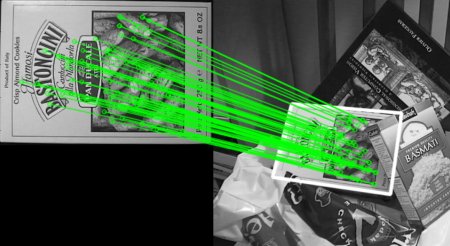
if len(good)>MIN_MATCH_COUNT:
    src_pts = np.float32([ kp1[m.queryIdx].pt for m in good ]).reshape(-1,1,2)
    dst_pts = np.float32([ kp2[m.trainIdx].pt for m in good ]).reshape(-1,1,2)

    M, mask = cv2.findHomography(src_pts, dst_pts, cv2.RANSAC,5.0)
    matchesMask = mask.ravel().tolist()

    h,w = img1.shape
    pts = np.float32([ [0,0],[0,h-1],[w-1,h-1],[w-1,0] ]).reshape(-1,1,2)
    dst = cv2.perspectiveTransform(pts,M)

    img2 = cv2.polylines(img2,[np.int32(dst)],True,255,3, cv2.LINE_AA)

else:
    print "Not enough matches are found - %d/%d" % (len(good),MIN_MATCH_COUNT)
    matchesMask = None
마지막으로 우리는 inliers (성공적으로 객체를 찾은 경우) 또는 matching keypoints (실패한 경우)를 그립니다.
draw_params = dict(matchColor = (0,255,0), # draw matches in green color
                   singlePointColor = None,
                   matchesMask = matchesMask, # draw only inliers
                   flags = 2)

img3 = cv2.drawMatches(img1,kp1,img2,kp2,good,None,**draw_params)

plt.imshow(img3, 'gray'),plt.show()
아래 결과를 참조하십시오. 어수선 된 이미지에서 개체가 흰색으로 표시됩니다.
'Robotics > Open CV python' 카테고리의 다른 글
Feature Matching (0) 2019.07.24 ORB (Oriented FAST and Rotated BRIEF) (0) 2019.07.24 BRIEF (Binary Robust Independent Elementary Features) (0) 2019.07.24 FAST Algorithm for Corner Detection (0) 2019.07.23 SURF (0) 2019.07.22